组件之间的通信
[TOC]
认识组件的嵌套
- 在之前的案例中,我们只是创建了一个组件App;
- 如果我们一个应用程序将所有的逻辑都放在一个组件中,那么这个组件就会变成非常的臃肿和难以维护;
- 所以组件化的核心思想应该是对组件进行拆分,拆分成一个个小的组件;
- 再将这些组件组合嵌套在一起,最终形成我们的应用程序;
我们来分析一下下面代码的嵌套逻辑,假如我们将所有的代码逻辑都放到一个App.vue组件中:
<template>
  <div>
    <h2>Header</h2>
    <h2>NavBar</h2>
  </div>
  <div>
    <h2>Banner</h2>
    <ul>
      <li>商品列表1</li>
      <li>商品列表2</li>
      <li>商品列表3</li>
      <li>商品列表4</li>
      <li>商品列表5</li>
    </ul>
  </div>
  <div>
    <h2>Footer</h2>
    <h2>免责声明</h2>
  </div>
</template>

<script>
export default {

};
</script>

<style scoped></style>
我们会发现,将所有的代码逻辑全部放到一个组件中,代码是非常的臃肿和难以维护的。并且在真实开发中,我们会有更多的内容和代码逻辑,对于扩展性和可维护性来说都是非常差的。
所有,在真实的开发中,我们会对组件进行拆分,拆分成一个个功能的小组件。
组件的拆分
如上代码, 我们可以按照如下的方式进行拆分:
App.vue
<template>
  <div id="app">
    <VueHeader></VueHeader>
    <VueMain></VueMain>
    <VueFooter></VueFooter>
  </div>
</template>

<script>
import VueHeader from './VueHeader.vue';
import VueMain from './VueMain.vue';
import VueFooter from './VueFooter.vue';

export default {
  name: 'App',
  components: {
    VueHeader,
    VueMain,
    VueFooter
  }
};
</script>

<style scoped></style>
Header.vue组件
<template>
  <div>
    <h2>Header</h2>
    <h2>NavBar</h2>
  </div>
</template>
Main.vue组件:
<template>
  <div>
    <vue-banner></vue-banner>
    <vue-product-list></vue-product-list>
  </div>
</template>

<script>
import VueBanner from './VueBanner.vue';
import VueProductList from './VueProductList.vue';

export default {
  name: 'VueMain',
  components: {
    VueBanner,
    VueProductList
  }
};
</script>
Banner.vue组件:
<template>
  <h2>Banner</h2>
</template>
ProductList组件:
<template>
  <ul>
    <li>商品列表1</li>
    <li>商品列表2</li>
    <li>商品列表3</li>
    <li>商品列表4</li>
    <li>商品列表5</li>
  </ul>
</template>
Footer.vue组件:
<template>
  <div>
    <h2>Footer</h2>
    <h2>免责声明</h2>
  </div>
</template>
按照如上的拆分方式后,我们开发对应的逻辑只需要去对应的组件编写就可。
组件的通信
上面的嵌套逻辑如下,它们存在如下关系:
- App组件是Header、Main、Footer组件的父组件;
- Main组件是Banner、ProductList组件的父组件;
在开发过程中,我们会经常遇到需要组件之间相互进行通信:
- 比如App可能使用了多个Header,每个地方的Header展示的内容不同,那么我们就需要使用者传递给Header一些数据,让其进行展示;
- 又比如我们在Main中一次性请求了Banner数据和ProductList数据,那么就需要传递给他们来进行展示;
- 也可能是子组件中发生了事件,需要有父组件来完成某些操作,那就需要子组件向父组件传递事件;
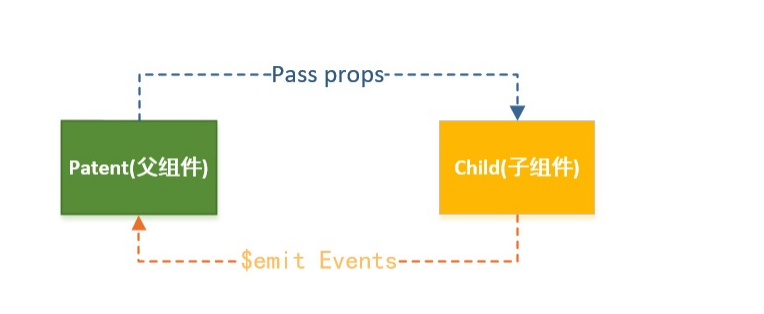
父子组件之间如何进行通信呢?
- 父组件传递给子组件:通过props属性;
- 子组件传递给父组件:通过$emit触发事件;
父传子
在开发中很常见的就是父子组件之间通信,比如父组件有一些数据,需要子组件来进行展示:
- 这个时候我们可以通过props来完成组件之间的通信;
什么是 props?
在Vue3中,props是一种用于向组件传递数据的机制。它允许父组件向子组件传递数据,并在子组件中使用这些数据。
在Vue3中,每个组件都可以定义自己的props,并指定每个prop的类型、默认值和其他验证规则。当父组件向子组件传递数据时,子组件可以使用这些props来访问传递过来的数据。
props 的定义
在Vue3中,props可以使用两种方式来定义:
- 字符串数组,数组中的字符串就是attribute的名称;
- 对象类型,对象类型我们可以在指定attribute名称的同时,指定它需要传递的类型、是否是必须的、默认值等等;
字符串数组
使用字符串数组的方式,可以简单地指定需要接收的属性名称。在这种情况下,属性类型默认为any。
在下面的示例中,父组件使用message="Hello from parent"将message属性作为字符串传递给子组件。在子组件中,使用props选项并传递一个字符串数组来定义message属性。这样子组件就可以使用message属性来访问父组件传递过来的数据了。
<!-- App.vue -->
<template>
  <div>
    <child-component message="Hello from parent"></child-component>
  </div>
</template>

<script>
import ChildComponent from './ChildComponent.vue'

export default {
  components: {
    ChildComponent
  }
}
</script>
<!--ChildComponent.vue -->
<template>
  <div>
    {{ message }}
  </div>
</template>

<script>
export default {
  props: ['message']
}
</script>
对象类型
使用对象类型的方式,可以更详细地指定需要接收的属性名称、类型、是否必须、默认值等等。
在下面的示例中,父组件使用:message="parentMessage"将parentMessage属性作为字符串传递给子组件。在子组件中,使用props选项并传递一个对象来定义message属性。在这个对象中,我们指定了type为字符串、required为true、default为'Hello from child'、以及一个自定义的验证函数。
这样子组件就可以使用message属性来访问父组件传递过来的数据了。
<!-- App.vue -->
<template>
  <div>
    <child-component :message="parentMessage"></child-component>
  </div>
</template>

<script>
import ChildComponent from './ChildComponent.vue'

export default {
  components: {
    ChildComponent
  },
  data() {
    return {
      parentMessage: 'Hello from parent'
    }
  }
}
</script>
<!--ChildComponent.vue -->
<template>
  <div>
    {{ message }}
  </div>
</template>

<script>
export default {
  props: {
    message: {
      type: String,
      // 必须传输?
      required: true,
      // 默认值
      default: 'Hello from child',
      // 传递的数据是否符合要求?
      validator: (value) => {
        return value.length > 0
      },
      info: String
    }
  }
}
</script>
其他
- Type的类型都可以是哪些?
- String:用于指定字符串类型的属性。
- Number:用于指定数字类型的属性。
- Boolean:用于指定布尔类型的属性。
- Array:用于指定数组类型的属性。
- Object:用于指定对象类型的属性。
- Date:用于指定日期类型的属性。
- Function:用于指定函数类型的属性。
- Symbol:用于指定符号类型的属性。
- 对象类型的其他写法
props: {
  // 基础的类型检查 (`null` 和 `undefined` 会通过任何类型验证)
  propA: Number,
  // 多个可能的类型
  propB: [String, Number],
  // 必填的字符串
  propC: {
    type: String,
    required: true
  },
  // 带有默认值的数字
  propD: {
    type: Number,
    default: 100
  },
  // 带有默认值的对象
  propE: {
    type: Object,
    // 对象或数组默认值必须从一个工厂函数获取, 因为每个实例需要维护一份被返回对象的独立的副本
    default: function () {
      return { message: 'hello' }
    }
  },
  // 自定义验证函数
  propF: {
    validator: function (value) {
      // 这个值必须匹配下列字符串中的一个
      return ['success', 'warning', 'danger'].indexOf(value) !== -1
    }
  },
  // 具有默认值的函数
  propG: {
    type: Function,
    // 对象或数组默认值必须从一个工厂函数获取
    default: function () {
      return { message: 'hello' }
    }
  }
}
- Prop 的大小写命名(camelCase vs kebab-case)
在Vue.js中,你可以使用驼峰式(camelCase)或短横线分隔(kebab-case)来命名你的props。然而,由于HTML属性不区分大小写,所以在模板中使用驼峰式命名的props时,需要转换为短横线分隔的形式。
例如,如果你在JavaScript中定义了一个名为myProp的prop,你需要在模板中使用my-prop来引用它。
这是一个例子:
<template>
  <div>
    <!-- 在模板中使用短横线分隔的形式 -->
    <child-component :my-prop="parentValue"></child-component>
  </div>
</template>

<script>
import ChildComponent from './ChildComponent.vue';

export default {
  components: {
    ChildComponent
  },
  data() {
    return {
      parentValue: 'Hello from Parent Component'
    }
  }
}
</script>
<!--ChildComponent.vue -->
<template>
  <div>
    <!-- 使用prop的值 -->
    <h2>{{ myProp }}</h2>
  </div>
</template>

<script>
export default {
  props: {
    // 在JavaScript中使用驼峰式命名
    myProp: String
  }
}
</script>
在这个例子中,父组件将其数据parentValue传递给子组件的myProp prop。注意在父组件模板中,我们使用短横线分隔的形式:my-prop,而在子组件的JavaScript代码中,我们使用驼峰式命名myProp, 这也是官方推荐的写法。
非 Prop 的Attribute
在Vue.js中,非prop的attribute是指那些被绑定到组件,但没有对应的prop定义的attribute。这些attribute会被添加到组件的根元素上。
例如,如果你有一个组件,它的模板是一个<div>元素,然后你在使用这个组件时添加了一个class或style属性,那么这个class或style属性就会被添加到<div>元素上,即使你没有在组件的props中定义它们。
这是一个例子:
<template>
  <div>
    <my-component id="abc" class="my-class" style="color: red;"></my-component>
  </div>
</template>

<script>
import MyComponent from './MyComponent.vue';

export default {
  components: {
    MyComponent
  }
}
</script>
在这个例子中,id, class和style就是非prop的attribute。它们会被添加到MyComponent的根元素上。
禁用 Attribute 继承
如果你不希望非prop的attribute被添加到根元素上,你可以在组件中定义一个inheritAttrs: false选项。这样,非prop的attribute将只能通过$attrs变量来访问,而不会被添加到根元素上。
export default {
  inheritAttrs: false
}
- 禁用attribute继承的常见情况是需要将attribute应用于根元素之外的其他元素;
- 我们可以通过
$attrs来访问所有的非props的attribute;
<template>
  <div>
    <h2 v-bind="$attrs">{{title}}</h2>
    <p>{{content}}</p>
  </div>
</template>
- 如上,
<h2>仍然会继承非prop的attribute
多个根节点的attribute
多个根节点的attribute如果没有显示的绑定,那么会报警告,我们必须手动的指定要绑定到哪一个属性上:
<template>
	<div :class="$attrs.class">
        我是NotPropAttribue组件1
    </div>
	<div>
    	我是NotPropAttribue组件2
    </div>
	<div>
        我是NotPropAttribue组件3
    </div>
</template>
子传父
什么情况下子组件需要传递内容到父组件呢?
- 当子组件有一些事件发生的时候,比如在组件中发生了点击,父组件需要切换内容;
- 子组件有一些内容想要传递给父组件的时候;
我们如何完成上面的操作呢?
- 首先,我们需要在子组件中定义好在某些情况下触发的事件名称;
- 其次,在父组件中以v-on的方式传入要监听的事件名称,并且绑定到对应的方法中;
- 最后,在子组件中发生某个事件的时候,根据事件名称触发对应的事件;
以下是一个简单的示例
<!-- 子组件 -->
<template>
  <button @click="sendDataToParent">传递数据给父组件</button>
</template>

<script>
export default {
  methods: {
    sendDataToParent() {
      const data = 'Hello, parent!';
      // 传递参数给父组件
      this.$emit('data-to-parent', data);
    }
  }
};
</script>
<!-- 父组件 -->
<template>
  <div>
    <child-component @data-to-parent="handleDataFromChild"></child-component>
  </div>
</template>

<script>
import ChildComponent from './ChildComponent.vue';

export default {
  components: {
    ChildComponent
  },
  methods: {
    handleDataFromChild(data) {
      console.log(data);
      // 在控制台打印子组件传递的数据
      // 在这里处理从子组件接收到的数据
    }
  }
};
</script>
emits
当使用Vue 3时,你可以使用emits选项来对子组件触发的自定义事件进行校验: 使用
emits选项可以提供类型检查和错误提示,确保子组件只触发被允许的自定义事件。这有助于提高代码的可维护性和可靠性。以下是一个示例:
export default {
  // 一般写法
  emits: ["add", "sub", "addN"],
  // 对象写法的目的是为了进行参数的验证
  emits: {
    add: null,
    sub: null,
    addN: (num, name, age) => {
      console.log(num, name, age);
      if (num > 10) {
        return true
      }
      return false;
    }
  }
}
非父子组件之间的通信
在开发中,我们构建了组件树之后,除了父子组件之间的通信之外,还会有非父子组件之间的通信。
这里我们主要讲两种方式:
- Provide/Inject
- Mitt全局事件总线;
Provide/Inject
Provide/Inject用于非父子组件之间共享数据:
- 比如有一些深度嵌套的组件,子组件想要获取父组件的部分内容;
- 在这种情况下,如果我们仍然将props沿着组件链逐级传递下去,就会非常的麻烦;
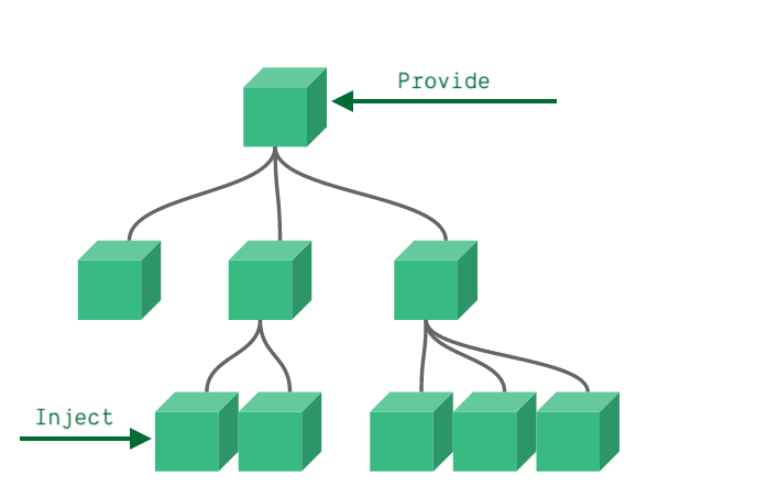
对于这种情况下,我们可以使用 Provide 和 Inject :
- 无论层级结构有多深,父组件都可以作为其所有子组件的依赖提供者;
- 父组件有一个
provide选项来提供数据; - 子组件有一个
inject选项来开始使用这些数据;
实际上,你可以将依赖注入看作是“long range props”,除了:
- 父组件不需要知道哪些子组件使用它
provide的property - 子组件不需要知道
inject的property来自哪里
<template>
  <div>
    <child-component></child-component>
  </div>
</template>

<script>
import ChildComponent from './ChildComponent.vue';

export default {
  components: {
    ChildComponent
  },
  provide() {
    return {
      message: 'Hello from the parent component'
    };
  }
};
</script>
<template>
  <div>
    <p>{{ message }}</p>
  </div>
</template>

<script>
export default {
  inject: ['message']
};
</script>
- 当然, 我们也可以通过 this 获取到当前组件定义的 data
import VueHome from './VueHome.vue';
import { computed } from 'vue';

export default {
  components: {
    VueHome
  },
  provide() {
    return {
      name: "why",
      age: 18,
      length: computed(() => this.names.length) // ref对象 .value
    }
  },
  data() {
    return {
      names: ["abc", "cba", "nba"]
    }
  },
  methods: {
    addName() {
      this.names.push("why");
      console.log(this.names);
    }
  }
}
全局事件总线 mitt 库
在 Vue 3 中,全局事件总线是一种用于在不同组件之间进行通信的机制。它允许你在任何组件中触发事件并在其他组件中监听和响应这些事件。
https://cn.vuejs.org/api/application.html#app-config-globalproperties
在 Vue 3 中,可以使用 app.config.globalProperties 来创建一个全局事件总线。通过将事件总线实例添加到全局属性中,你可以在任何组件中访问它,从而实现跨组件的事件通信。
以下是一个示例:
// 在 main.js 中创建全局事件总线
import { createApp } from 'vue';

const app = createApp(App);

app.config.globalProperties.$bus = createEventBus();

app.mount('#app');
创建一个名为 createEventBus 的函数来创建事件总线实例:
function createEventBus() {
  const listeners = {};

  function on(event, callback) {
    if (!listeners[event]) {
      listeners[event] = [];
    }
    listeners[event].push(callback);
  }

  function emit(event, ...args) {
    if (listeners[event]) {
      listeners[event].forEach(callback => {
        callback(...args);
      });
    }
  }

  return {
    on,
    emit
  };
}
现在,你可以在任何组件中使用 $bus来触发事件和监听事件:
<template>
  <div>
    <button @click="sendMessage">发送消息</button>
  </div>
</template>

<script>
export default {
  methods: {
    sendMessage() {
      this.$bus.emit('message', 'Hello from component A');
    }
  }
};
</script>
<template>
  <div>
    <button @click="sendMessage">发送消息</button>
  </div>
</template>

<script>
export default {
  methods: {
    sendMessage() {
      this.$bus.emit('message', 'Hello from component A');
    }
  }
};
</script>
在上述示例中,当点击按钮时,组件 A 使用 $bus.emit 发送了一个名为 'message' 的事件,并传递了消息 'Hello from component A'。组件 B 使用 $bus.on 监听了 'message' 事件,并将接收到的消息显示在页面上。
通过全局事件总线,你可以在不同组件之间进行简单而方便的通信,而无需显式地通过 props 或其他方式传递数据。 [TOC]
认识组件的嵌套
- 在之前的案例中,我们只是创建了一个组件App;
- 如果我们一个应用程序将所有的逻辑都放在一个组件中,那么这个组件就会变成非常的臃肿和难以维护;
- 所以组件化的核心思想应该是对组件进行拆分,拆分成一个个小的组件;
- 再将这些组件组合嵌套在一起,最终形成我们的应用程序;
我们来分析一下下面代码的嵌套逻辑,假如我们将所有的代码逻辑都放到一个App.vue组件中:
<template>
  <div>
    <h2>Header</h2>
    <h2>NavBar</h2>
  </div>
  <div>
    <h2>Banner</h2>
    <ul>
      <li>商品列表1</li>
      <li>商品列表2</li>
      <li>商品列表3</li>
      <li>商品列表4</li>
      <li>商品列表5</li>
    </ul>
  </div>
  <div>
    <h2>Footer</h2>
    <h2>免责声明</h2>
  </div>
</template>

<script>
export default {

};
</script>

<style scoped></style>
我们会发现,将所有的代码逻辑全部放到一个组件中,代码是非常的臃肿和难以维护的。并且在真实开发中,我们会有更多的内容和代码逻辑,对于扩展性和可维护性来说都是非常差的。
所有,在真实的开发中,我们会对组件进行拆分,拆分成一个个功能的小组件。
组件的拆分
如上代码, 我们可以按照如下的方式进行拆分:
App.vue
<template>
  <div id="app">
    <VueHeader></VueHeader>
    <VueMain></VueMain>
    <VueFooter></VueFooter>
  </div>
</template>

<script>
import VueHeader from './VueHeader.vue';
import VueMain from './VueMain.vue';
import VueFooter from './VueFooter.vue';

export default {
  name: 'App',
  components: {
    VueHeader,
    VueMain,
    VueFooter
  }
};
</script>

<style scoped></style>
Header.vue组件
<template>
  <div>
    <h2>Header</h2>
    <h2>NavBar</h2>
  </div>
</template>
Main.vue组件:
<template>
  <div>
    <vue-banner></vue-banner>
    <vue-product-list></vue-product-list>
  </div>
</template>

<script>
import VueBanner from './VueBanner.vue';
import VueProductList from './VueProductList.vue';

export default {
  name: 'VueMain',
  components: {
    VueBanner,
    VueProductList
  }
};
</script>
Banner.vue组件:
<template>
  <h2>Banner</h2>
</template>
ProductList组件:
<template>
  <ul>
    <li>商品列表1</li>
    <li>商品列表2</li>
    <li>商品列表3</li>
    <li>商品列表4</li>
    <li>商品列表5</li>
  </ul>
</template>
Footer.vue组件:
<template>
  <div>
    <h2>Footer</h2>
    <h2>免责声明</h2>
  </div>
</template>
按照如上的拆分方式后,我们开发对应的逻辑只需要去对应的组件编写就可。
组件的通信
上面的嵌套逻辑如下,它们存在如下关系:
- App组件是Header、Main、Footer组件的父组件;
- Main组件是Banner、ProductList组件的父组件;
在开发过程中,我们会经常遇到需要组件之间相互进行通信:
- 比如App可能使用了多个Header,每个地方的Header展示的内容不同,那么我们就需要使用者传递给Header一些数据,让其进行展示;
- 又比如我们在Main中一次性请求了Banner数据和ProductList数据,那么就需要传递给他们来进行展示;
- 也可能是子组件中发生了事件,需要有父组件来完成某些操作,那就需要子组件向父组件传递事件;
父子组件之间如何进行通信呢?
- 父组件传递给子组件:通过props属性;
- 子组件传递给父组件:通过$emit触发事件;
父传子
在开发中很常见的就是父子组件之间通信,比如父组件有一些数据,需要子组件来进行展示:
- 这个时候我们可以通过props来完成组件之间的通信;
什么是 props?
在Vue3中,props是一种用于向组件传递数据的机制。它允许父组件向子组件传递数据,并在子组件中使用这些数据。
在Vue3中,每个组件都可以定义自己的props,并指定每个prop的类型、默认值和其他验证规则。当父组件向子组件传递数据时,子组件可以使用这些props来访问传递过来的数据。
props 的定义
在Vue3中,props可以使用两种方式来定义:
- 字符串数组,数组中的字符串就是attribute的名称;
- 对象类型,对象类型我们可以在指定attribute名称的同时,指定它需要传递的类型、是否是必须的、默认值等等;
字符串数组
使用字符串数组的方式,可以简单地指定需要接收的属性名称。在这种情况下,属性类型默认为any。
在下面的示例中,父组件使用message="Hello from parent"将message属性作为字符串传递给子组件。在子组件中,使用props选项并传递一个字符串数组来定义message属性。这样子组件就可以使用message属性来访问父组件传递过来的数据了。
<!-- App.vue -->
<template>
  <div>
    <child-component message="Hello from parent"></child-component>
  </div>
</template>

<script>
import ChildComponent from './ChildComponent.vue'

export default {
  components: {
    ChildComponent
  }
}
</script>
<!--ChildComponent.vue -->
<template>
  <div>
    {{ message }}
  </div>
</template>

<script>
export default {
  props: ['message']
}
</script>
对象类型
使用对象类型的方式,可以更详细地指定需要接收的属性名称、类型、是否必须、默认值等等。
在下面的示例中,父组件使用:message="parentMessage"将parentMessage属性作为字符串传递给子组件。在子组件中,使用props选项并传递一个对象来定义message属性。在这个对象中,我们指定了type为字符串、required为true、default为'Hello from child'、以及一个自定义的验证函数。
这样子组件就可以使用message属性来访问父组件传递过来的数据了。
<!-- App.vue -->
<template>
  <div>
    <child-component :message="parentMessage"></child-component>
  </div>
</template>

<script>
import ChildComponent from './ChildComponent.vue'

export default {
  components: {
    ChildComponent
  },
  data() {
    return {
      parentMessage: 'Hello from parent'
    }
  }
}
</script>
<!--ChildComponent.vue -->
<template>
  <div>
    {{ message }}
  </div>
</template>

<script>
export default {
  props: {
    message: {
      type: String,
      // 必须传输?
      required: true,
      // 默认值
      default: 'Hello from child',
      // 传递的数据是否符合要求?
      validator: (value) => {
        return value.length > 0
      },
      info: String
    }
  }
}
</script>
其他
- Type的类型都可以是哪些?
- String:用于指定字符串类型的属性。
- Number:用于指定数字类型的属性。
- Boolean:用于指定布尔类型的属性。
- Array:用于指定数组类型的属性。
- Object:用于指定对象类型的属性。
- Date:用于指定日期类型的属性。
- Function:用于指定函数类型的属性。
- Symbol:用于指定符号类型的属性。
- 对象类型的其他写法
props: {
  // 基础的类型检查 (`null` 和 `undefined` 会通过任何类型验证)
  propA: Number,
  // 多个可能的类型
  propB: [String, Number],
  // 必填的字符串
  propC: {
    type: String,
    required: true
  },
  // 带有默认值的数字
  propD: {
    type: Number,
    default: 100
  },
  // 带有默认值的对象
  propE: {
    type: Object,
    // 对象或数组默认值必须从一个工厂函数获取, 因为每个实例需要维护一份被返回对象的独立的副本
    default: function () {
      return { message: 'hello' }
    }
  },
  // 自定义验证函数
  propF: {
    validator: function (value) {
      // 这个值必须匹配下列字符串中的一个
      return ['success', 'warning', 'danger'].indexOf(value) !== -1
    }
  },
  // 具有默认值的函数
  propG: {
    type: Function,
    // 对象或数组默认值必须从一个工厂函数获取
    default: function () {
      return { message: 'hello' }
    }
  }
}
- Prop 的大小写命名(camelCase vs kebab-case)
在Vue.js中,你可以使用驼峰式(camelCase)或短横线分隔(kebab-case)来命名你的props。然而,由于HTML属性不区分大小写,所以在模板中使用驼峰式命名的props时,需要转换为短横线分隔的形式。
例如,如果你在JavaScript中定义了一个名为myProp的prop,你需要在模板中使用my-prop来引用它。
这是一个例子:
<template>
  <div>
    <!-- 在模板中使用短横线分隔的形式 -->
    <child-component :my-prop="parentValue"></child-component>
  </div>
</template>

<script>
import ChildComponent from './ChildComponent.vue';

export default {
  components: {
    ChildComponent
  },
  data() {
    return {
      parentValue: 'Hello from Parent Component'
    }
  }
}
</script>
<!--ChildComponent.vue -->
<template>
  <div>
    <!-- 使用prop的值 -->
    <h2>{{ myProp }}</h2>
  </div>
</template>

<script>
export default {
  props: {
    // 在JavaScript中使用驼峰式命名
    myProp: String
  }
}
</script>
在这个例子中,父组件将其数据parentValue传递给子组件的myProp prop。注意在父组件模板中,我们使用短横线分隔的形式:my-prop,而在子组件的JavaScript代码中,我们使用驼峰式命名myProp, 这也是官方推荐的写法。
非 Prop 的Attribute
在Vue.js中,非prop的attribute是指那些被绑定到组件,但没有对应的prop定义的attribute。这些attribute会被添加到组件的根元素上。
例如,如果你有一个组件,它的模板是一个<div>元素,然后你在使用这个组件时添加了一个class或style属性,那么这个class或style属性就会被添加到<div>元素上,即使你没有在组件的props中定义它们。
这是一个例子:
<template>
  <div>
    <my-component id="abc" class="my-class" style="color: red;"></my-component>
  </div>
</template>

<script>
import MyComponent from './MyComponent.vue';

export default {
  components: {
    MyComponent
  }
}
</script>
在这个例子中,id, class和style就是非prop的attribute。它们会被添加到MyComponent的根元素上。
禁用 Attribute 继承
如果你不希望非prop的attribute被添加到根元素上,你可以在组件中定义一个inheritAttrs: false选项。这样,非prop的attribute将只能通过$attrs变量来访问,而不会被添加到根元素上。
export default {
  inheritAttrs: false
}
- 禁用attribute继承的常见情况是需要将attribute应用于根元素之外的其他元素;
- 我们可以通过
$attrs来访问所有的非props的attribute;
<template>
  <div>
    <h2 v-bind="$attrs">{{title}}</h2>
    <p>{{content}}</p>
  </div>
</template>
- 如上,
<h2>仍然会继承非prop的attribute
多个根节点的attribute
多个根节点的attribute如果没有显示的绑定,那么会报警告,我们必须手动的指定要绑定到哪一个属性上:
<template>
	<div :class="$attrs.class">
        我是NotPropAttribue组件1
    </div>
	<div>
    	我是NotPropAttribue组件2
    </div>
	<div>
        我是NotPropAttribue组件3
    </div>
</template>
子传父
什么情况下子组件需要传递内容到父组件呢?
- 当子组件有一些事件发生的时候,比如在组件中发生了点击,父组件需要切换内容;
- 子组件有一些内容想要传递给父组件的时候;
我们如何完成上面的操作呢?
- 首先,我们需要在子组件中定义好在某些情况下触发的事件名称;
- 其次,在父组件中以v-on的方式传入要监听的事件名称,并且绑定到对应的方法中;
- 最后,在子组件中发生某个事件的时候,根据事件名称触发对应的事件;
以下是一个简单的示例
<!-- 子组件 -->
<template>
  <button @click="sendDataToParent">传递数据给父组件</button>
</template>

<script>
export default {
  methods: {
    sendDataToParent() {
      const data = 'Hello, parent!';
      // 传递参数给父组件
      this.$emit('data-to-parent', data);
    }
  }
};
</script>
<!-- 父组件 -->
<template>
  <div>
    <child-component @data-to-parent="handleDataFromChild"></child-component>
  </div>
</template>

<script>
import ChildComponent from './ChildComponent.vue';

export default {
  components: {
    ChildComponent
  },
  methods: {
    handleDataFromChild(data) {
      console.log(data);
      // 在控制台打印子组件传递的数据
      // 在这里处理从子组件接收到的数据
    }
  }
};
</script>
emits
当使用Vue 3时,你可以使用emits选项来对子组件触发的自定义事件进行校验: 使用
emits选项可以提供类型检查和错误提示,确保子组件只触发被允许的自定义事件。这有助于提高代码的可维护性和可靠性。以下是一个示例:
export default {
  // 一般写法
  emits: ["add", "sub", "addN"],
  // 对象写法的目的是为了进行参数的验证
  emits: {
    add: null,
    sub: null,
    addN: (num, name, age) => {
      console.log(num, name, age);
      if (num > 10) {
        return true
      }
      return false;
    }
  }
}
动态组件
Vue.js 的动态组件是指可以根据不同的数据渲染不同的组件的功能。你可以使用 Vue.js 的 <component> 元素来实现动态组件。
例如,你可以在父组件中定义一个数据属性,根据这个属性的值来决定渲染哪个子组件。然后,在模板中使用 <component> 元素,并将该数据属性绑定到 is 属性上,这样就可以动态地渲染不同的子组件了。
<script>
import Home from './Home.vue'
import Posts from './Posts.vue'
import Archive from './Archive.vue'

export default {
  components: {
    Home,
    Posts,
    Archive
  },
  data() {
    return {
      currentTab: 'Home',
      tabs: ['Home', 'Posts', 'Archive']
    }
  }
}
</script>

<template>
  <div class="demo">
    <button
       v-for="tab in tabs"
       :key="tab"
       :class="['tab-button', { active: currentTab === tab }]"
       @click="currentTab = tab"
     >
      {{ tab }}
    </button>
	  <component :is="currentTab" class="tab"></component>
  </div>
</template>
非父子组件之间的通信
在开发中,我们构建了组件树之后,除了父子组件之间的通信之外,还会有非父子组件之间的通信。
这里我们主要讲两种方式:
- Provide/Inject
- Mitt全局事件总线;
Provide/Inject
Provide/Inject用于非父子组件之间共享数据:
- 比如有一些深度嵌套的组件,子组件想要获取父组件的部分内容;
- 在这种情况下,如果我们仍然将props沿着组件链逐级传递下去,就会非常的麻烦;
对于这种情况下,我们可以使用 Provide 和 Inject :
- 无论层级结构有多深,父组件都可以作为其所有子组件的依赖提供者;
- 父组件有一个
provide选项来提供数据; - 子组件有一个
inject选项来开始使用这些数据;
实际上,你可以将依赖注入看作是“long range props”,除了:
- 父组件不需要知道哪些子组件使用它
provide的property - 子组件不需要知道
inject的property来自哪里
<template>
  <div>
    <child-component></child-component>
  </div>
</template>

<script>
import ChildComponent from './ChildComponent.vue';

export default {
  components: {
    ChildComponent
  },
  provide() {
    return {
      message: 'Hello from the parent component'
    };
  }
};
</script>
<template>
  <div>
    <p>{{ message }}</p>
  </div>
</template>

<script>
export default {
  inject: ['message']
};
</script>
- 当然, 我们也可以通过 this 获取到当前组件定义的 data
import VueHome from './VueHome.vue';
import { computed } from 'vue';

export default {
  components: {
    VueHome
  },
  provide() {
    return {
      name: "why",
      age: 18,
      length: computed(() => this.names.length) // ref对象 .value
    }
  },
  data() {
    return {
      names: ["abc", "cba", "nba"]
    }
  },
  methods: {
    addName() {
      this.names.push("why");
      console.log(this.names);
    }
  }
}
全局事件总线 mitt 库
在 Vue 3 中,全局事件总线是一种用于在不同组件之间进行通信的机制。它允许你在任何组件中触发事件并在其他组件中监听和响应这些事件。
https://cn.vuejs.org/api/application.html#app-config-globalproperties
在 Vue 3 中,可以使用 app.config.globalProperties 来创建一个全局事件总线。通过将事件总线实例添加到全局属性中,你可以在任何组件中访问它,从而实现跨组件的事件通信。
以下是一个示例:
// 在 main.js 中创建全局事件总线
import { createApp } from 'vue';

const app = createApp(App);

app.config.globalProperties.$bus = createEventBus();

app.mount('#app');
创建一个名为 createEventBus 的函数来创建事件总线实例:
function createEventBus() {
  const listeners = {};

  function on(event, callback) {
    if (!listeners[event]) {
      listeners[event] = [];
    }
    listeners[event].push(callback);
  }

  function emit(event, ...args) {
    if (listeners[event]) {
      listeners[event].forEach(callback => {
        callback(...args);
      });
    }
  }

  return {
    on,
    emit
  };
}
现在,你可以在任何组件中使用 $bus来触发事件和监听事件:
<template>
  <div>
    <button @click="sendMessage">发送消息</button>
  </div>
</template>

<script>
export default {
  methods: {
    sendMessage() {
      this.$bus.emit('message', 'Hello from component A');
    }
  }
};
</script>
<template>
  <div>
    <button @click="sendMessage">发送消息</button>
  </div>
</template>

<script>
export default {
  methods: {
    sendMessage() {
      this.$bus.emit('message', 'Hello from component A');
    }
  }
};
</script>
在上述示例中,当点击按钮时,组件 A 使用 $bus.emit 发送了一个名为 'message' 的事件,并传递了消息 'Hello from component A'。组件 B 使用 $bus.on 监听了 'message' 事件,并将接收到的消息显示在页面上。
通过全局事件总线,你可以在不同组件之间进行简单而方便的通信,而无需显式地通过 props 或其他方式传递数据。